Path Tracing Photorealistic 3D Fractals
Abstract
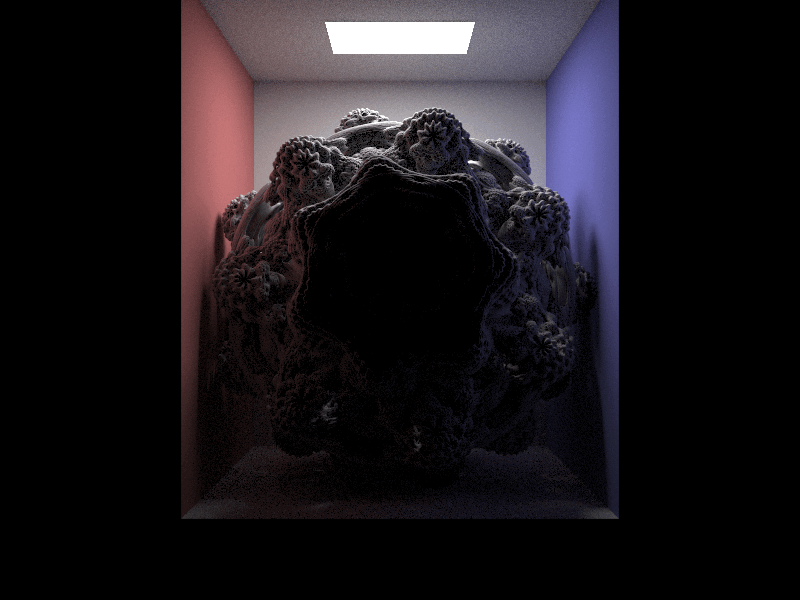
Our project is aimed at rendering high-quality, realistic-looking, difficult-to-render 3D fractals inside realistic scenes (like a Cornell Box) using ray marching and signed distance functions. Due to the complexity of these fractals, distance estimators are used instead of analytic intersections. This project focuses on rendering a slice of a higher dimensional Mandelbrot set (8-power Mandelbulb). We successfully rendered a flyover video to see the fine details of the Mandelbulb by stitching together the frames with different camera position settings via Bezier curves that we defined manually.
Technical Approach
Summary
Our project comprises of three main parts: Integrating fractals into the rendering pipeline Rendering fractals by implementing distance estimators and raymarching Creating a render sequencer to build a “flyover” of our fractals The following sections will dive deeper into how we implemented these components as well as the issues we encountered along the way.
Integrating Fractals
To render fractals, we create new primitives and scene objects. We were able to embed fractals in the scene by adding files to scene and gl_scene. Afterwards, modifications to collada.cpp allowed the fractal to be picked up. The advantage of implementing fractals in this manner is that they are treated like any other object in the scene. The main difference is that its intersection function uses ray marching and a fractal SDF to calculate intersections.
Initially, we used a sphere to represent a fractal. As we implemented intersections (which is covered more in depth in the next section), we also
Rendering Fractals with Distance Estimation and Raymarching
Unlike ray tracing, ray marching does not rely on explicit equations to describe geometry of the objects in a scene (like ray sphere intersections, for example), but instead, it uses SDFs (signed distance functions) to determine the distance between a point in space and the nearest object surface. In ray marching, we are iteratively evaluating the distance function to see if the ray has intersected the object.
Although the basic raymarching technique is quite simple, raymarching such a complex fractal has substantial pitfalls and difficulties. We will cover these issues and how we overcame them later.
Brief Background: The Mandelbulb
The Mandelbrot is a fractal based on the Mandelbrot set. The Mandelbrot set is based on iterating $f(z) = z^2 + c$ (both complex numbers). If a value after these many iterations is unbounded, it is not part of the Mandelbrot set—if it is unbounded, it is part of the Mandelbrot set. This “procedure” produces beautiful infinite “recursive” fractals.
We wanted to render a more complex version of this fractal in 3D, however. Such a fractal is called the Mandelbulb.
There is no 3D analogue of the Mandelbrot fractal, however. This is because the Mandelbrot fractal is defined by iterating on complex numbers. Unfortunately, it is impossible to render a fractal in 3D using this because the extension means these complex numbers cannot satisfy all three properties of a group (mathematically, i.e. closure, associativity, identity, and existence of inverse). (In simple terms, there’s no “3D algebra”)
However, we can use hypercomplex numbers, such as quaternions (effectively 4D complex numbers; think of real numbers as 1D complex numbers, “normal” complex numbers being two-dimensional with one component being real and imaginary, and so on. 3D complex numbers do not satisfy all the properties of a group, but 4D ones (quaternions, referred to above) do. To extend the analogy we made above: there’s no “3D algebra”, but there is “4D algebra”.
We use quaternions, therefore, to generate the Mandelbulb. Specifically, we use the equation $m(z) = m^n + c$. Instead of $m$ and $c$ being complex numbers, they are now quaternions. We also specify different powers; for us, we selected a power 8 Mandelbulb, hence $n=8$.
Our SDF and raymarcher
SDF
Our SDF is based on the mathematics above. For a point, we iterate on the formula a set number of times (see the first paragraph of the section above), and return a value based on whether we are diverging or not.
A substantial amount of time and effort went into debugging this SDF, especially when further capabilities were added.
One issue was that of divergence. We were finding that the SDF would diverge too quickly in some cases, causing our raytracer to actually exceed the fractal and not “retreat” (as an SDF should) properly. This required substantial debugging of the SDF, including changing our polar transforms.
SDF: implementing rotations and translations
Implementing rotations was easy and quick. In order to rotate a fractal in the scene, we simply took the input ray and rotated it as appropriate using rotation matrices before performing calculations with the SDF. This enabled us to input in Euler angles and get a rotated fractal.
Implementing translations was unexpectedly difficult. One would imagine it to be even easier than rotations, but instead attempting to translate the fractal within a scene caused it to come apart. This was related to divergence issues within the SDF. It was a result of the fact that the translation of the fractal in a scene is going to result in a different “view” from the camera’s perspective rather than the scene.
Raymarcher
Implementing a raymarcher was not very difficult.
Our raymarcher is a fairly traditional implementation. It calls our SDF function repeatedly to get the distance to our fractal, and marches the ray forward by an amount given by the SDF function. Once we find the distance between the ray and fractal is below EPS, we consider it an intersection and perform the appropriate next steps. If, after a set number of steps, we find that the distance is not decreasing, we terminate the raymarcher, assuming there will be no intersection between the ray and fractal.
As part of trying to deal with some floating-point error issues that come up when using the Mandelbulb SDF, we also implemented an “exponential degradation” functionality in the raytracer, although we don’t use this in the final product (it sometimes helps, but we have left it out for now since we didn’t test it with other scenes). As the raymarcher continues to march a ray forward, the magnitude we march the ray by is reduced according to $\text{degradatation_constant}^0.99$ (where we set degradation_constant = 0.99 typically). This helps our raytracer converge when using difficult SDFs.
This is unnecessary for rendering virtually anything else, especially using simpler SDFs like the tetrahedron.
Normal calculation
The calculation of normals is fairly easy to implement. The normals are calculated numerically, rather than analytically.
Upon finding an intersection, we simply calculate the gradient vector. Gradients (based on trivial multivariate calculus) give us the direction perpendicular to the “contour line” (i.e. the line representing the surface of the fractal at the intersection point). We normalize the gradient and return based on this.
This does unfortunately slow down our rendering since it requires some extra calls to estimate_SDF. The performance slow down however is not enough to make rendering impractical.
Final note
We are able to render other shapes; not just Mandelbulb.
Cameras, Transforms, and Bézier Curves
Before we could render sequences, we had to make modifications to the camera. 3-1 supports loading camera settings from files, but it assumes that you have already calculated several variables regarding the camera’s transform and angling. We had to reverse engineer the code for this (accounting for the particular axis ordering used in the program) and had to iron out several other quirks along the way.
In order to create videos that move through the scene, we created a separate python program. This program takes in a number of parameters: An output file, a scene, a number of frames, a set of path tracer parameters, a start and end frame (so you can render on multiple machines at once), and two files contain bezier curves. These 3D bezier curves define the path of the camera and the path of the point that the camera points towards. In order to help design these curves, we created a modified version of the Meshedit bezier curve editor to use our coordinate system and output the positions of the curve nodes. The program then calls the pathtracer multiple times, each time feeding in the parameters it was called with and generating a new camera settings file to move the camera. Once the render sequence is complete, we used FFmpeg to stitch the frames into a seamless video.
 A demonstration of the flyover code
Problems (and Solutions)
Rendering Pipeline
We faced many issues attempting to fit fractals into the rendering pipeline. We could not find tags that made sense for editing collada/.dae files, and eventually gave up on patching application.cpp. Instead, we chose to detect specific spheres and replace them with an instance of a fractal. This entailed creating Fractal Primitives, SceneObjects and modifying collada.cpp heavily.
Afterwards, the challenge became getting our code to compile. This was a tricky game of code golf, figuring out which header files to put where, and what edits we had to make to our CMakeLists.txt. Overall, there were lots of bumps getting everything to compile, but we made it!
BSDFs
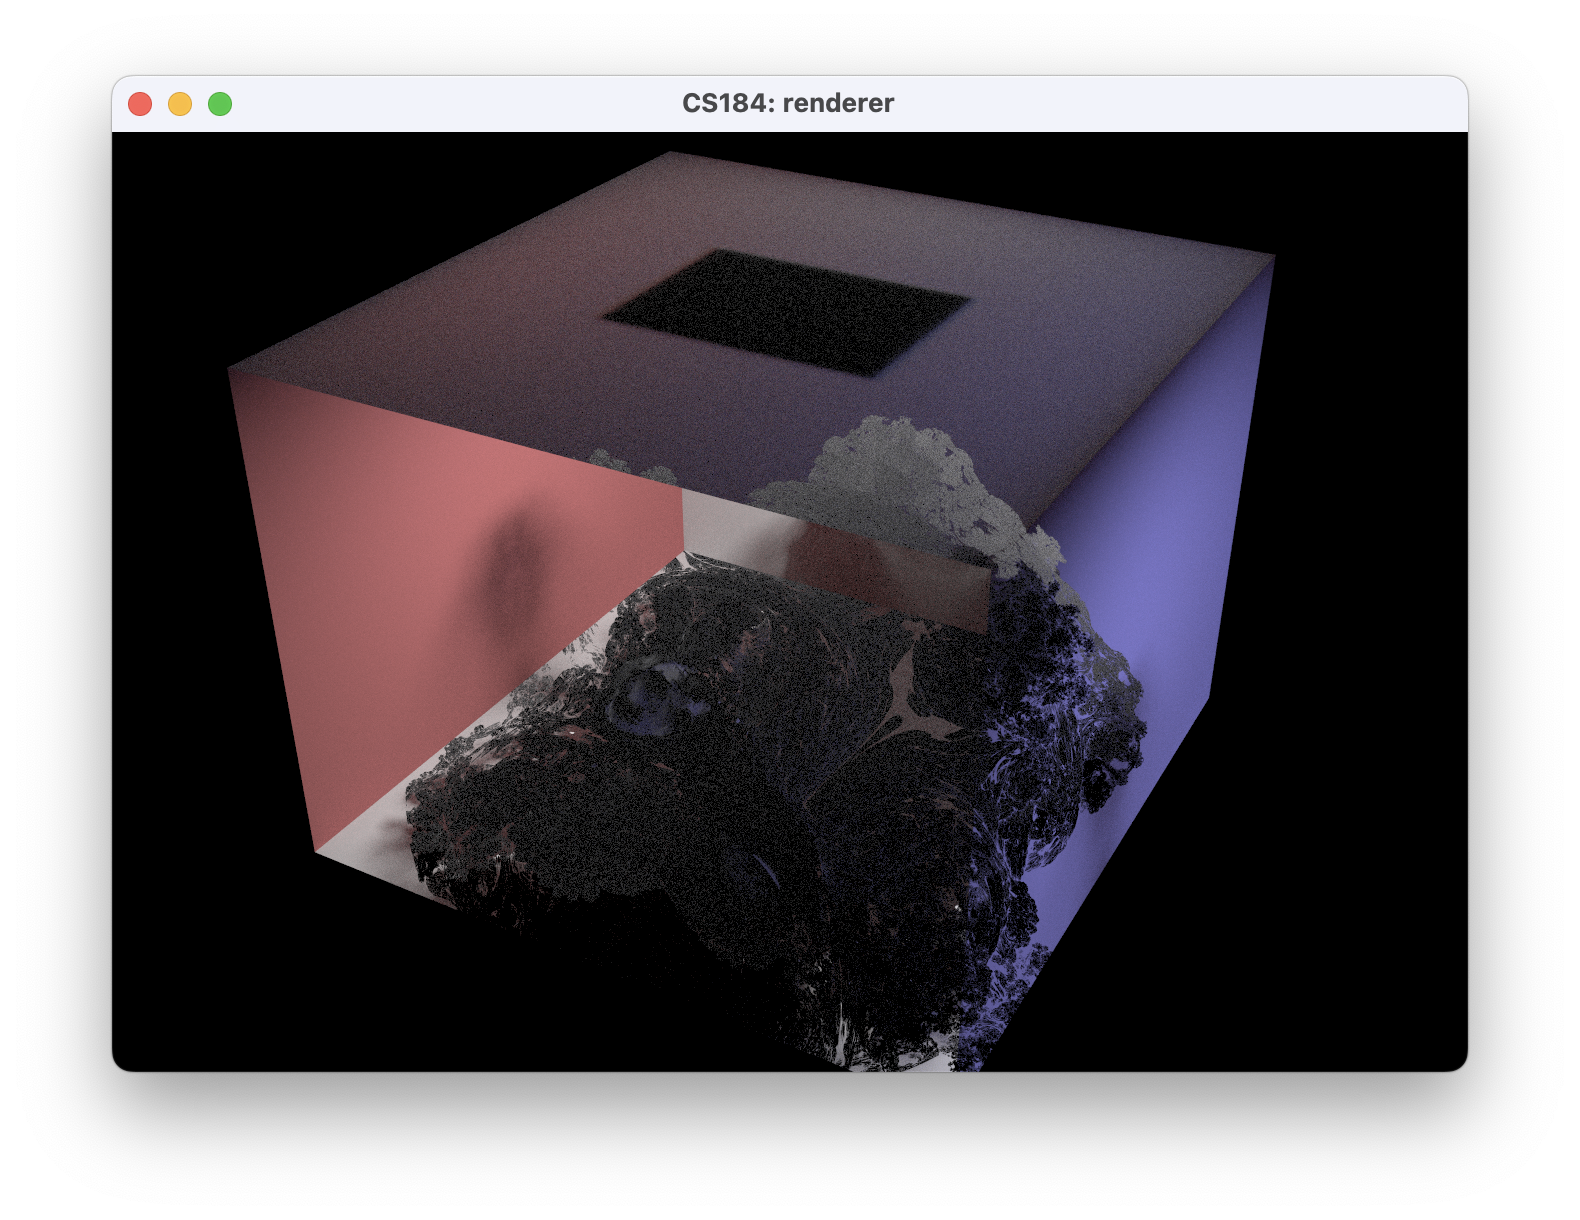
One goal of ours was to have advanced BSDFs working with our fractals. Almost immediately however, we ran into a series of issues getting advanced BSDFs to work with our 3-1 code at all. Since we used the staff binary in project 3-2, we struggled to bring our 3-1 code up to par. Once we finally had BSDFs working in the default scenes, we moved on to trying to get it to work with our fractal. While we were able to render diffuse BSDFs correctly on the fractal, advanced BSDFs did not work in conjunction with the changes we had made to the BVH to resolve fractal ordering problems. In our advanced BSDF results, we can see that the ordering of the walls and fractals is not correct. Given more time, we would have loved to make this completely work, but for now, we’ve included the renders as a proof-of-concept!
Non-solid fractals
Our early renditions of the Mandelbulb were partially transparent. There would be no intersections at the folds of the fractal causing us to have transparent gaps. To fix this, we implemented exponential degradation to account for smaller step sizes as the SDF is scaled down. We also tuned the tolerance and steps the raymarcher would take to fit the fractal we wanted to render.
Rotations and Transforms
Rotations and translations with the SDF (in order to place fractal in scene properly) (solution: later) Getting depth ordering to work properly during intersection (solution: later) Lighting the fractal properly as we “zoom in infinitely” (solution: dynamic light generation)
Lessons Learned
Start early: high quality renders take a lot of time Mandelbulb is fun word Peer programming is a useful technique, especially with languages like C++ It’s important to learn the mathematics in detail before implementing something in code—the Mandelbulb SDF was a classic example of this.
Results
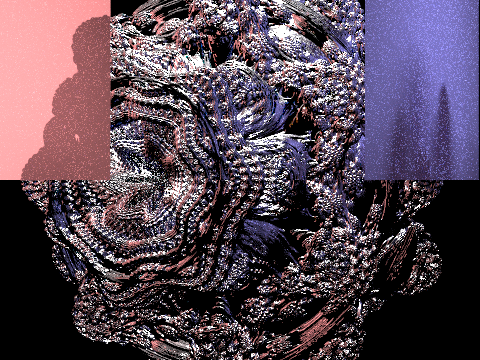
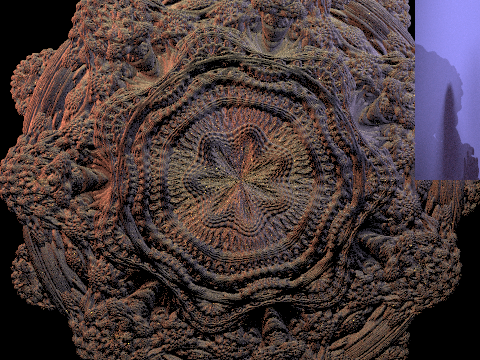
 Fractal flyover using our sequence renderer
 A demonstration of our fractal rotation capabilities
 A proof of concept of a fractal with a mirror BSDF
References
https://iquilezles.org/articles/ - very helpful blog to learn about 3D fractals and distance functions http://blog.hvidtfeldts.net/index.php/2015/01/path-tracing-3d-fractals/
Contributions
Chetan Khanna:
- SDF for Mandelbulb: mathematics, function, debugging, rotation and translation
- Tetrahedron SDF (partially, basic code)
- Correct depth in scene (raymarcher intersection, not the raymarcher itself)
- Exponential “degradation” in raymarcher
- “Dynamic point lights”
Inga Zhuravleva:
- Scene generation
- Tetrahedron debugging and rendering
Kenneth Lien:
- Some tetrahedron SDF code
- Integrated fractals into rendering pipeline
- Created fractal files in
scene,gl_scene. - Modified
collada.cppto allow fractal rendering. - Tuned fractal rendering parameters to achieve Mandelbulb shape
- Ported project 3-2 BSDF code for rendering metals, mirrors, and more.
Miles Turin:
- Created the sequence renderer (video maker)
- Modified existing camera code to work with the sequence renderer
- Fractal integration (OOP)
- Ray marching
- BSDF debugging and experimentation